Tissue Paper Background Tutorial

We were talking about background textures on the Paper Whimsy forum and I thought it would be fun to do a basic tutorial on one of my favorites; tissue paper background! Easy peasy, anyone can do it and you probably have all the supplies on hand. Have fun!
I own all the text and images in this tutorial – feel free to use them for whatever you want. Commercial, not commercial, credit me or don’t credit me it’s all good with me. Hugs, Carol

I own all the text and images in this tutorial – feel free to use them for whatever you want. Commercial, not commercial, credit me or don’t credit me it’s all good with me. Hugs, Carol

Step ONE: Gather all your supplies. You will need:
- Substrate - things like cardboard, heavy watercolor paper and cardstock work best for this technique.
- Tissue Paper – any color, design or style. If you don’t like the color or design you can paint over it, right?
- Adhesive – I use gel medium but you can use any wet adhesive like Elmer’s glue or ModPodge.
- Paint Brush – any size or style but I would recommend 1”-3” in width depending on the size of the substrate. You want to be able to apply the adhesive quickly.
- Assorted Inks - sprays, paint, alcohol inks, stamp pads to name a few.

Step TWO: Crumple the tissue paper. I usually crumple the tissue pretty tight (left of photo); then loosely open it as shown to the right of the photo. Of course it depends on the end result you want for your background. The more you open up the tissue, the less texture you will get.
Step THREE: Using the paint brush, apply the adhesive somewhat generously to the substrate. Use enough adhesive so that it remains wet until you can place the crumpled tissue on it. I don’t spend a lot of time thinking about the placement of the tissue. I just plop it on there and press it down using my hands.

If I want a more flat texture, I use a brayer or the adhesive jar/bottle to press it down a bit more.

Step FOUR: While the tissue is still wet, tear off the extra tissue around the edges. You can trim the edges with a scissor if you want but I like the randomness of the torn edges.
At this point, I usually put a light layer of the adhesive over the top and let it dry completely before proceeding to the next step.
Once the tissue is dry…create to your heart’s desire. Rub ink pads over the raised area to highlight them or use acrylic paints and dry-brush them on. Just go crazy and have fun!
*****************************************************************************
Here’s a piece I quickly did to show you a collage piece from start to finish. I started with some old tissue that came in a gift package, crumpled it up, unfolded it a bit, and glued it to the cardboard substrate. Notice that this tissue paper didn’t leave large wrinkles like the pink one did. It was a bit lighter weight and didn’t crumple as much. Interesting, huh? Who knew? LoL

Next I tore along the edges of the substrate to remove the extra tissue and applied a light coating of gel medium over the top. Notice that this time around, I applied the gel after tearing…see you can mix it up! I hate repetition and rarely do things exactly the same way twice.

After the tissue was dry, I took my “Old Paper” Distress Ink stamp pad and rubbed it over the raised areas. I was surprised how many highlights actually came out…it didn’t look like there were that many; did it?
After the ink was dry, I laid a stencil on it and sprayed over the top with “Orange Juice” Memories Mist. I LOVE orange!
After that was dry I took a favorite rubber stamp, inked it up with black ink from a stamp pad and made a row of paisley designs across a portion of the background.
After that was dry I used my favorite fluid chalk pads and rubbed around the edges in hot pink and orange, which you can see in the next photo. For me, this is what makes art interesting…lots of layers on the background…and this is before you even start putting your images and embellishments on.

Notice that I always let each layer dry before adding a different color element. Otherwise, things can get muddied up a bit and unless that is what you are going for, it will be disappointing to do all this work and have to gesso over it only to begin again. Wah! However, I always have my heat gun handy to help the drying process along; just don’t get it so close that the adhesive bubbles up or the tissue catches on fire! LoL
Reminder - when using a heat tool always keep your eyes on what you are doing. From beginning to end, this background only took about ten minutes. 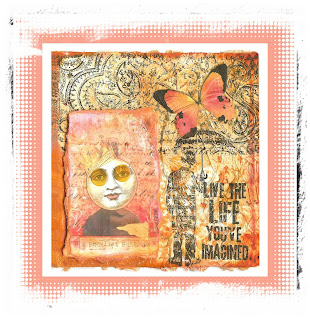

Now you are ready to add your collage bits! Can’t wait to see what you create next! Hugs, Carol


7 comments:
Beautiful! Thank you for sharing the technique ... I'll be trying it soon.
Oh good Nancy, I hope you do! It's so easy and adds such a nice element to a collage or ATC. Once you have the tissue on, you can just go crazy with everything else. Have fun!
Beautiful Carol! I've used this technique on wood without crumpling it up, but will definitely try it this way :)
Hi Carol,
I love this technique and your collage is awesome. Love your work.
debby
Thanks for sharing Carol I have to try this xx
Hi Carol...
I don't do collage, etc....but you make it all look so easy, I may just give it a shot...Reading your tutorial I found I have most of what you use here in my studio...
Thanks for your generous sharing...hug, hug
I love tutorials and this one is just awesome, thanks for posting it.
Post a Comment